
Screen Loading for Flutter
Capture the time it takes for your Flutter widgets to load and identify slow loading widgets
Minimum SDK version
Screen Loading is supported starting Flutter SDK version 13.2.0
Screen Loading
Instabug records the time it takes your widgets to load from the start init() method until the completion of the build() method, which which marks the screen being fully rendered and visible on the screen.
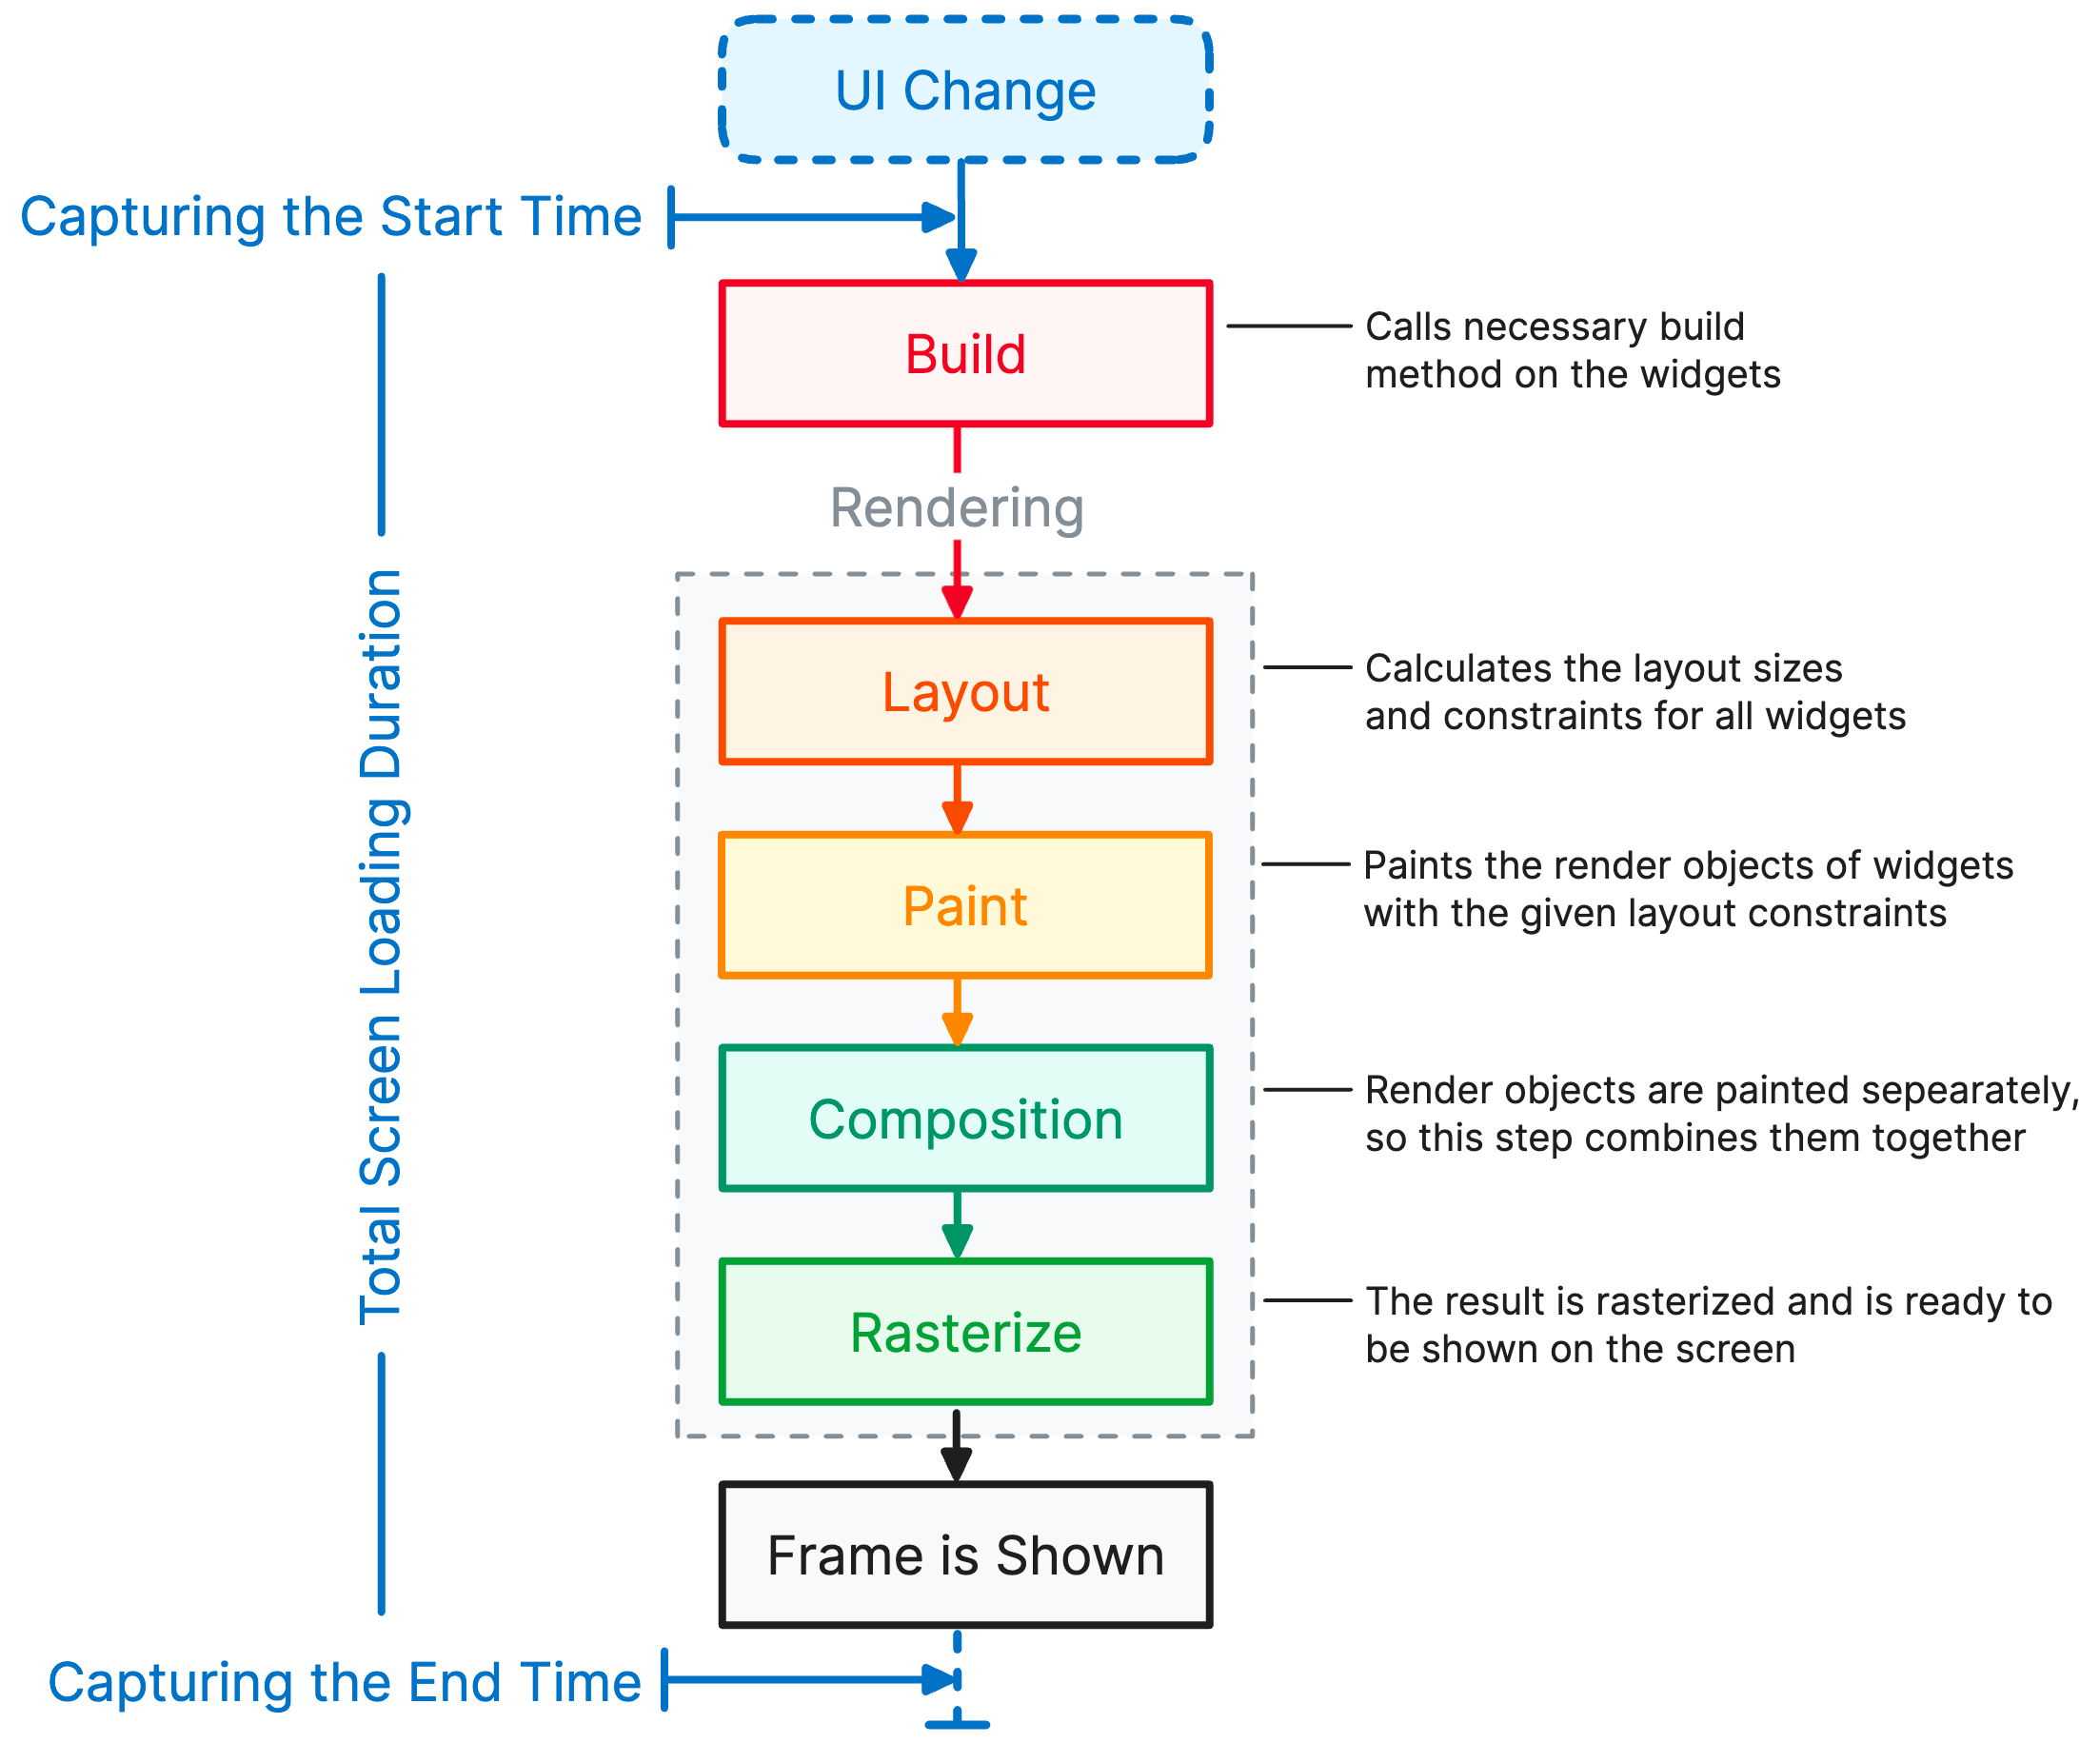
A visualization of Flutter’s screen loading and rendering process showing the points at which Instabug marks the start and end of screen loading.
Features
Spans
Instabug automatically captures all network calls and iOS database queries your app makes during your widget loading. Analyzing the latency of these APIs can help you find root causes for a slow screen loading.
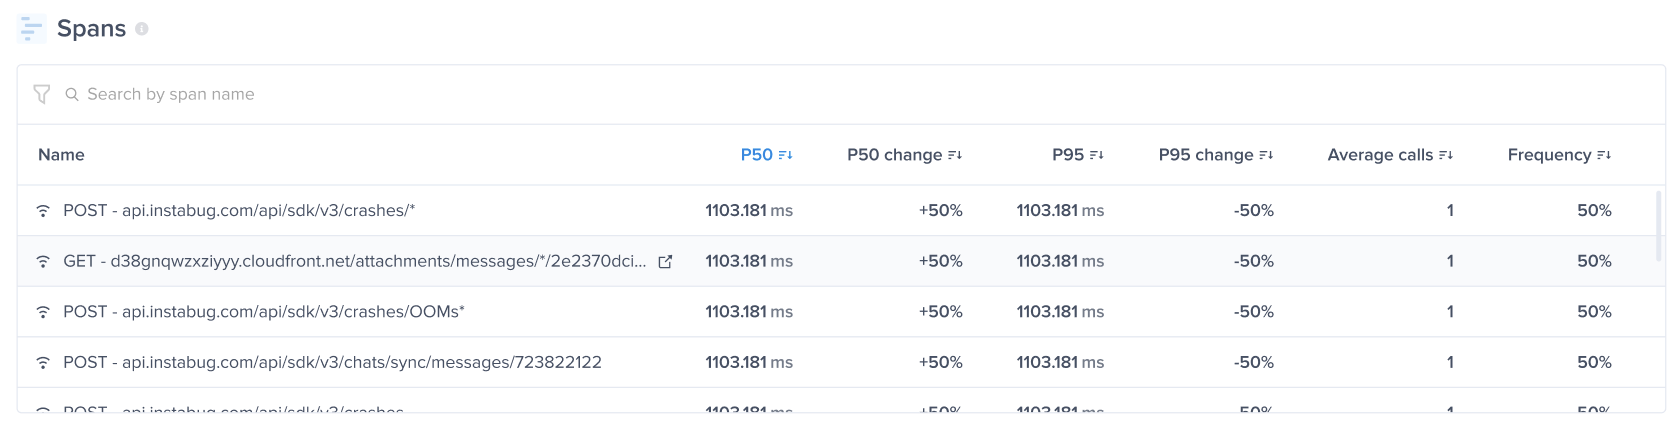
Pro Tip: You can click on any network trace in the spans table to view the full details of that network call!
Patterns
Your screen loading data is automatically segmented by various user, and device attributes. Comparing your loading performance across these different dimensions can help you spot if specific segments of your user base are facing issues or help you reproduce the issue during debugging.
You can drill-down into any of segment by quickly adding it as a filter or viewing all occurrences of that segment.
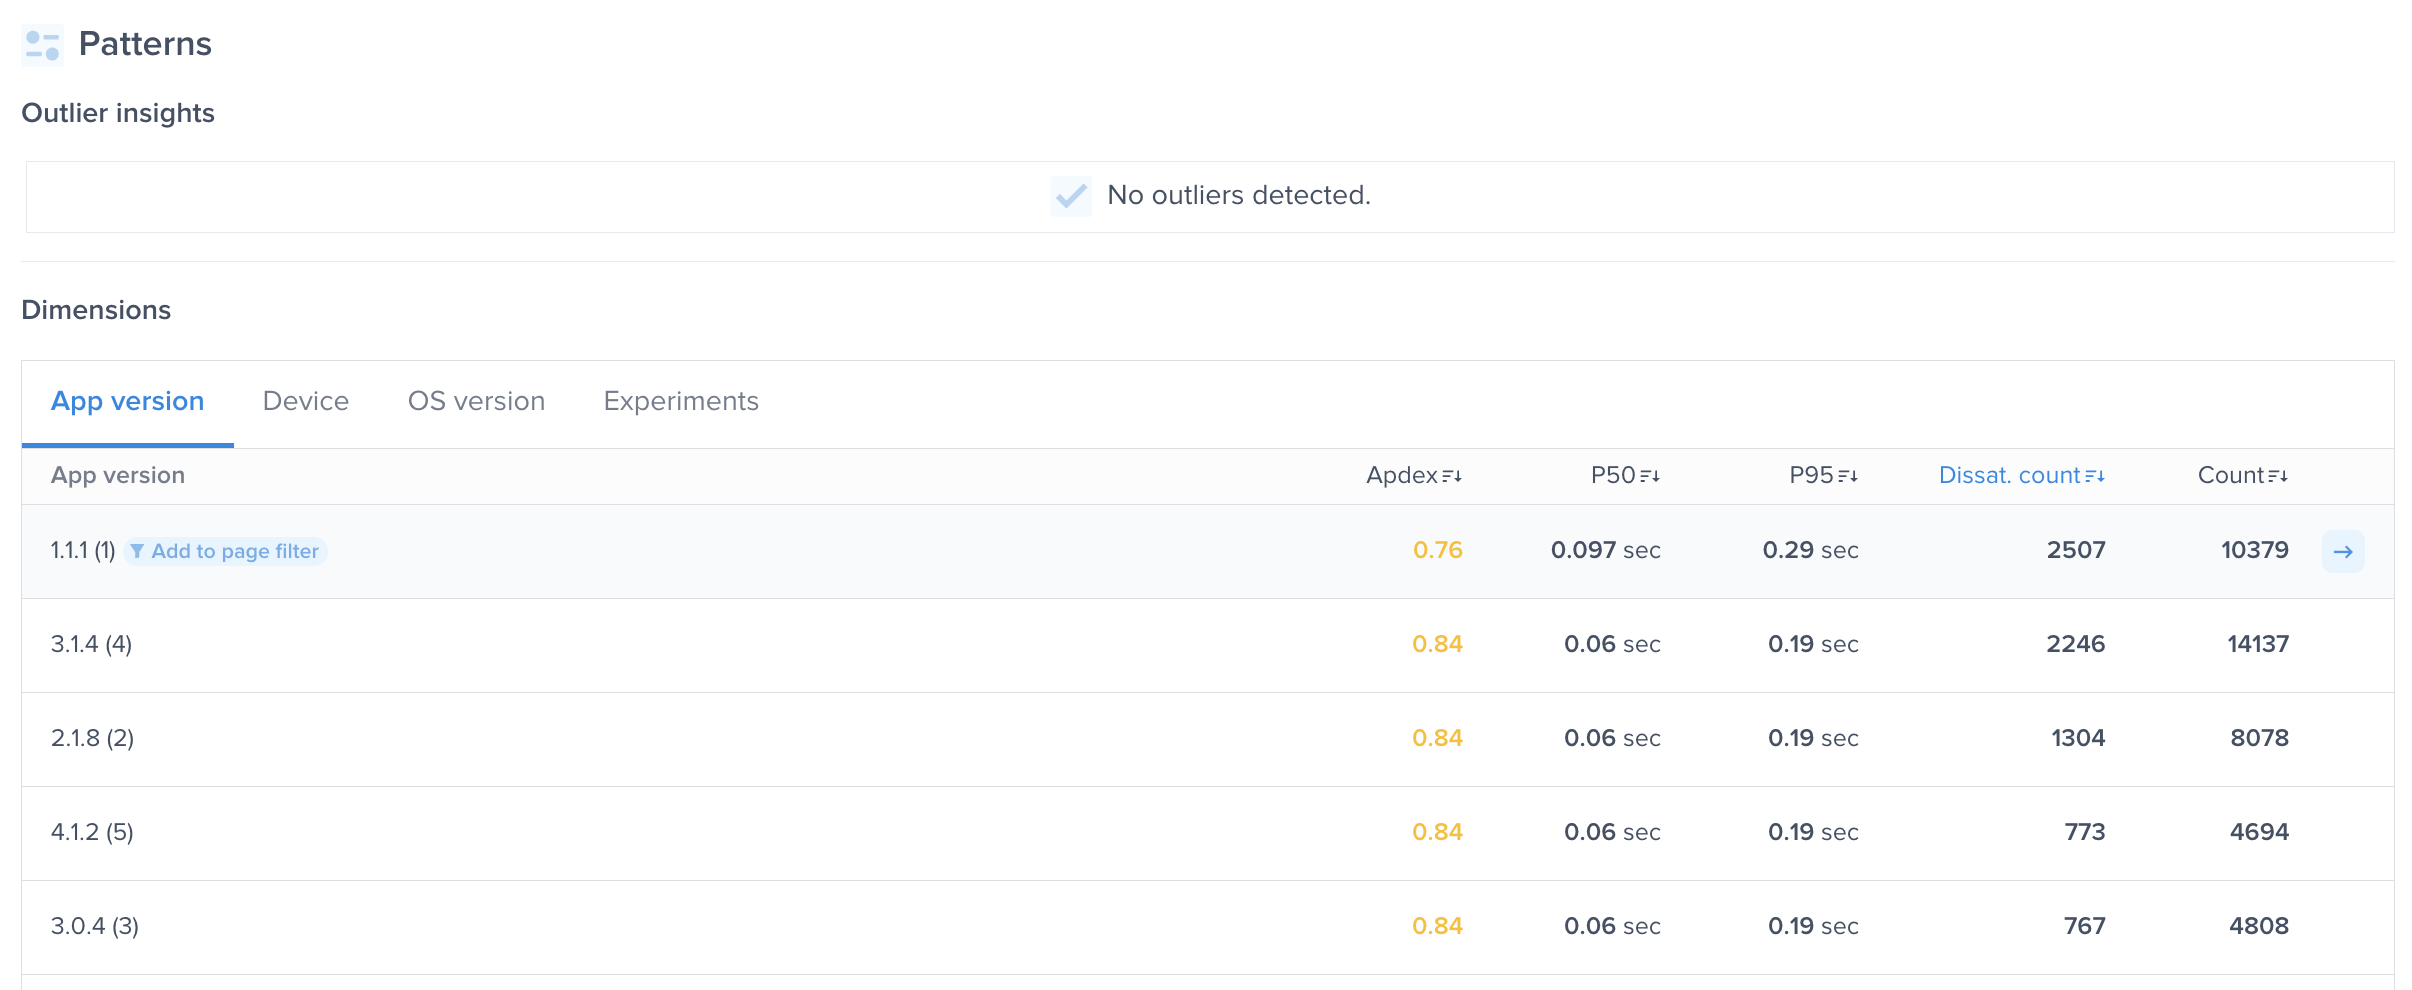
If you hover over any dimension, quick actions for adding it to filter or seeing all occurrences appear
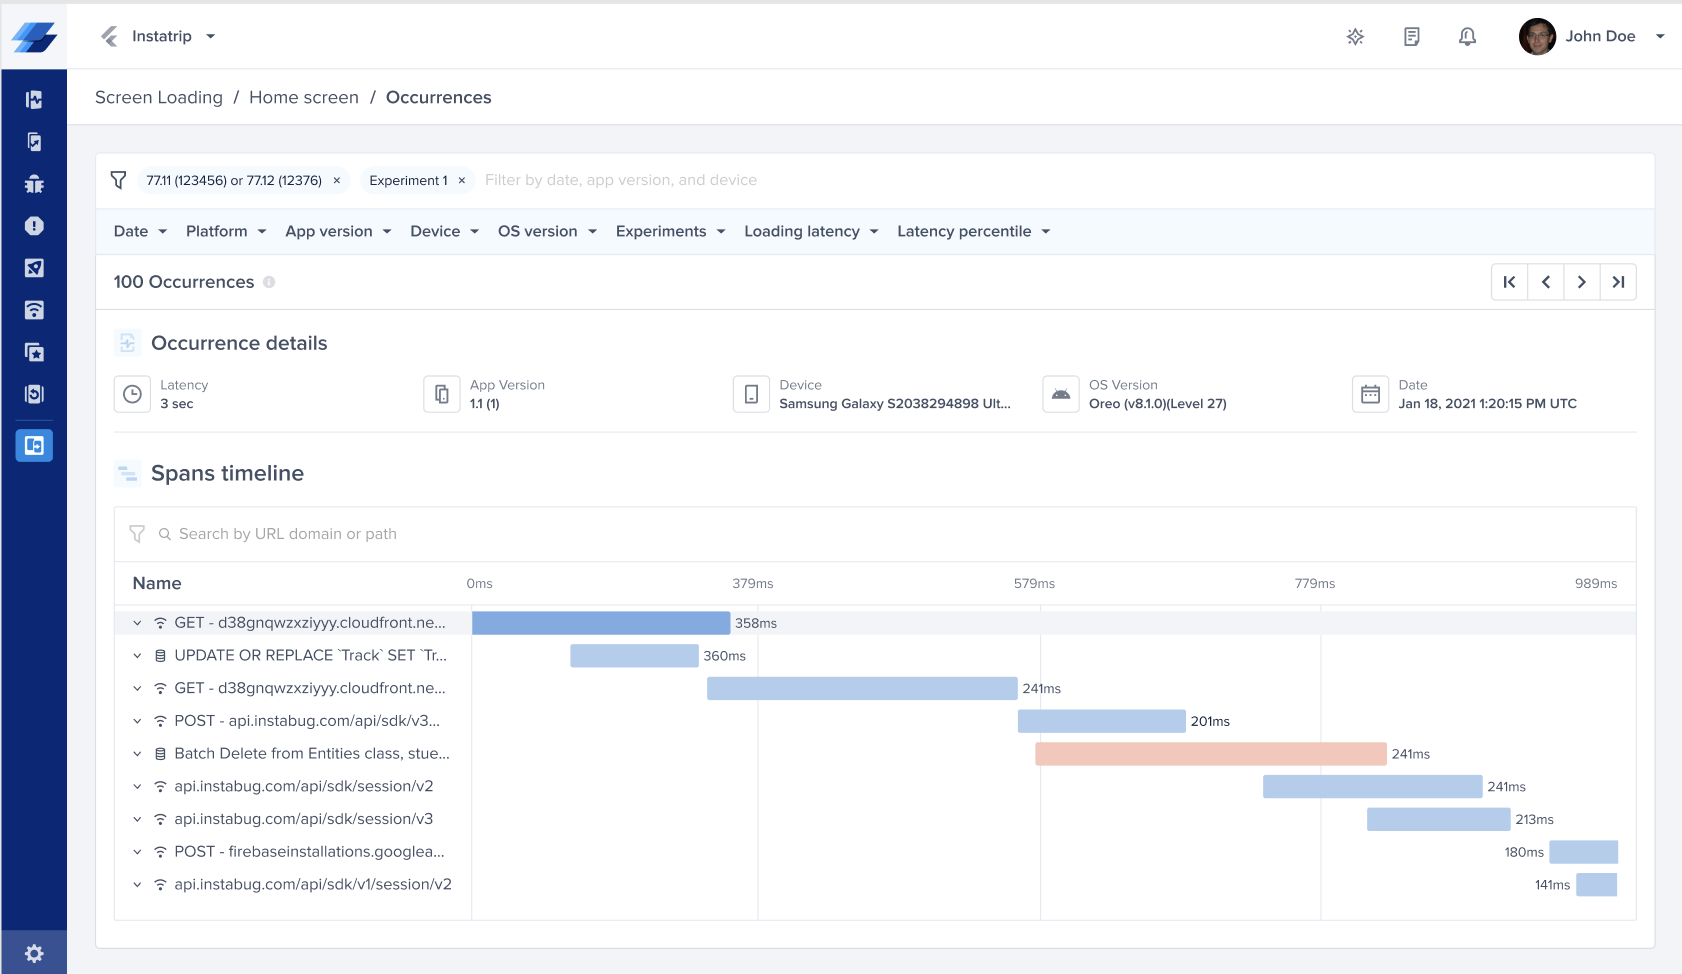
Occurrences
If you prefer to view individual occurrences, you can click “View Occurrences” to see all occurrences of screen loading. You can see the details of the individual occurrence such as latency, app version, device, etc. and a span timeline that shows all the network occurrences recorded during the loading.
Instrumentation
The Instrumentation required will depend on the navigator used by your app.
Instabug supports automatic (one per app) instrumentation for some navigation methods. There is also a manual approach you can use for any non-supported navigation methods/ libraries.
The following navigators support the one-time instrumentation:
For any other navigators, see the manual instrumentation.
We’re working to support more navigators automatically
If you’d like us to support your navigation method in the future, please reach out to our support team and let us know what navigator you use.
Navigator 1.0 (Named Routes)
If you’re using the default Flutter Navigator 1.0 and named routes, you'll need to:
- Add the
InstabugNavigatorObserver()to your app’snavigatorObservers - Wrap your routes in the
APM.wrapRoutes()wrapper.
This will allow the Instabug SDK to automatically capture all the screens defined in your named routes.
If you want to exclude certain routes from being captured, you can add the exclude:[] parameter to the APM.wrapRoutes(), which takes as input a list of Strings marking route names you want excluded.
Here’s what that looks like:
MaterialApp(
  navigatorObservers: [InstabugNavigatorObserver()],   // Our navigation observer
  routes: APM.wrapRoutes({                             // The routes wrapper
    '/': (context) => HomePage(),
    '/settings': (context) => SettingsPage(),
    '/profile': (context) => ProfilePage(),
    '/traffic': (context) => TrafficPage(),
  }, exclude: ['/', '/traffic']),                      // Excluded routes
  ...
)
The screen loading time of wrapped screens will be captured automatically when you push it to the navigation stack.
Navigator.pushNamed(context,"/settings");
If you want to exclude certain routes from being captured, you can add the exclude:[] parameter to the APM.wrapRoutes().
Flutter Modular
If you’re using the Flutter Modular v5, you need to install the Instabug Flutter Modular package.
Installation
- Add
instabug_flutter_modularto yourpubspec.yamlfile.
dependencies:
  instabug_flutter_modular:
- Install the package by running the following command.
flutter pub get
Instrumentation
- Wrap your main
module:in ourInstabugModule()wrapper in themain()method:
void main() {
  ...
  runApp(
    ModularApp(
      module: InstabugModule(AppModule()),   //Our Wrapper
      child: const MyApp(),
    ),
  );
}
- Add the
InstabugNavigatorObserver()to your App’srouter()in yourmain()method:
@override
  Widget build(BuildContext context) {
    return MaterialApp.router(
        routeInformationParser: Modular.routeInformationParser,
        routerDelegate: Modular.routerDelegate
          ..setObservers([InstabugNavigatorObserver()]),   //Our navigator observer
        title: 'Flutter Modular Demo',
        ...
      );
    }
The Instabug SDK will automatically capture all screens within the wrapped module.
Manual Instrumentation
If you’re using any other navigation method, you can measure the loading of any widget in your app by wrapping it in the InstabugCaptureScreenLoading widget during navigation as shown below:
  Navigator.push(
      context,
      MaterialPageRoute(
        builder: (context) => const InstabugCaptureScreenLoading( //Our wrapper
          screenName: SecondScreen.screenName,
          child: SecondScreen(),
        ),
        settings: const RouteSettings(name: SecondScreen.screenName), //should match the [screenName] property of InstabugCaptureScreenLoading() widget
      ),
    );
The
screenNameproperty ofInstabugCaptureScreenLoadingneeds to match the route name specified in theRouteSettings.
End Screen Loading
If you don’t want to consider the screen “loaded” until after a specific point (e.g. a specific element loading or a splash screen ending), you can extend the screen loading capture time beyond the default definition.
APM.endScreenLoading();
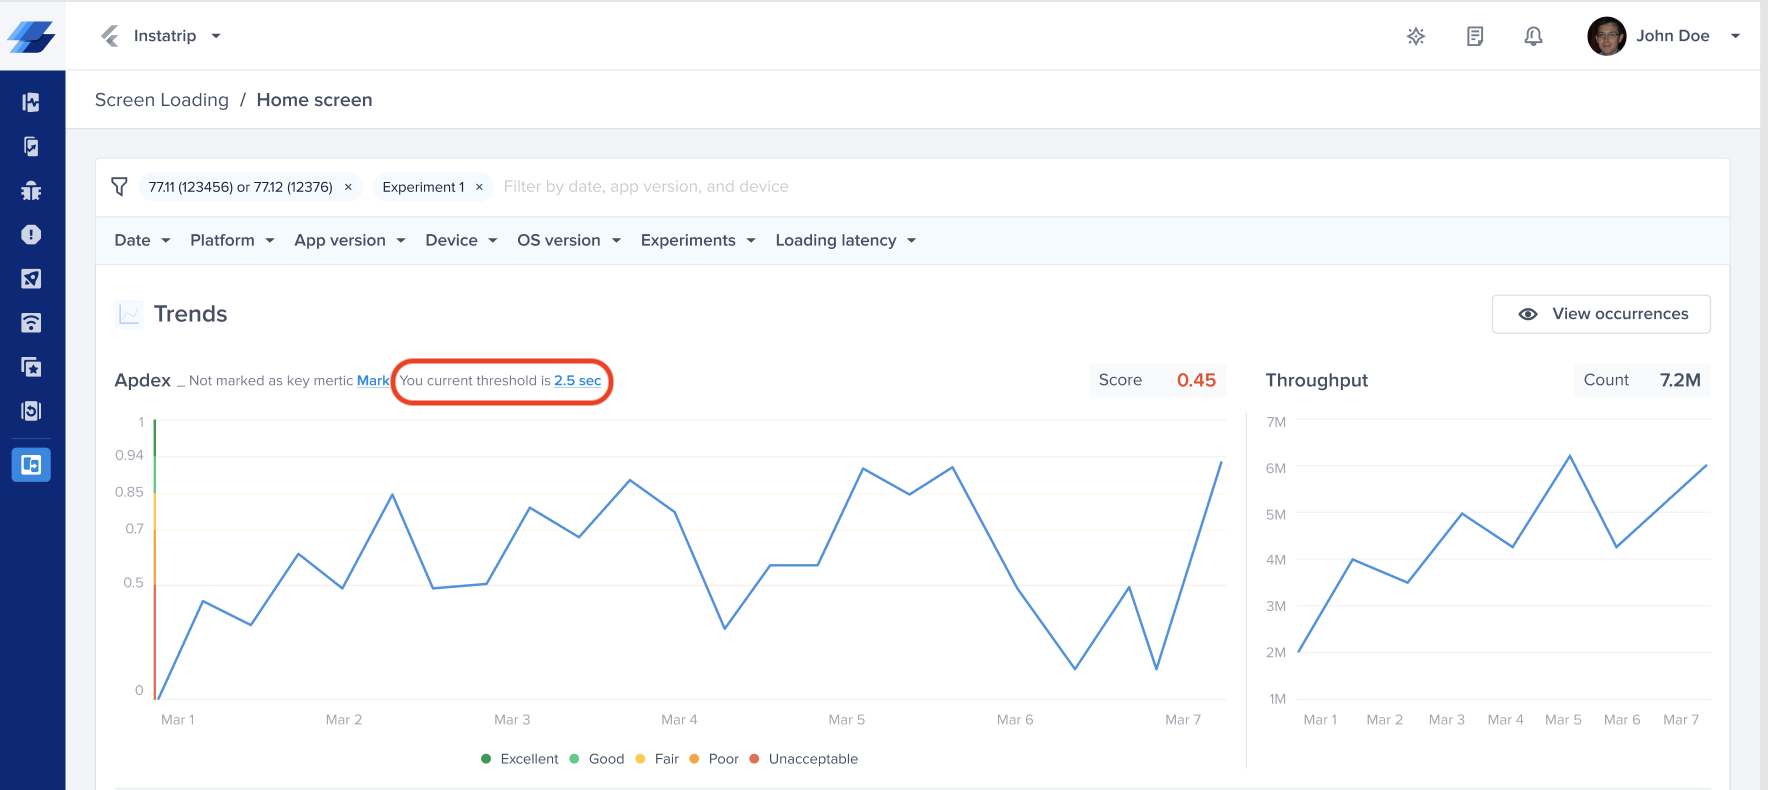
Apdex Calculation for Screen Loading
Instabug calculates an Apdex score that reflects the performance of your Flows. An Apdex score ranges between 0 and 1; the higher the value, the better the performance:
- Apdex score ≥ of 0.94 equates to Excellent performance.
- Apdex score ≥ 0.85 and < 0.94 equates to Good performance.
- Apdex score ≥ 0.7 and < 0.85 equates to Fair performance.
- Apdex score ≥ 0.5 and < 0.7 equates to Poor performance.
- Apdex score < 0.5 is considered Unacceptable performance.
The following color-code criteria is also applied:

How is the Apdex Calculated
When a screen loading occurrence is collected from the SDK, it is flagged based on the target duration (T) for that screen loading. A screen loading occurrence is considered:
- Satisfying: if its duration ≤ T
- Tolerable: if its duration > T and ≤ 4T
- Frustrating: if its duration > 4T
The Apdex score for each screen is then calculated as follows:
- Apdex score = (Satisfying occurrences + 0.5 * Tolerable occurrences) / Total occurrences
- Where: Total occurrences = Satisfying occurrences + Tolerable occurrences + Frustrating occurrences
For example, if a screen had 5 satisfying loading occurrences, 3 tolerable occurrences, and 2 frustrating occurrences, we calculate the Apdex as follows:
Apdex score = (5 satisfying occurrences + 0.5 * 3 tolerable occurrences) / 10 total occurrences = 0.65
How Can You Control a Specific Screen's Target?
By default, the target for all screen loads is set to 0.1 seconds; however, you can easily change this number from your dashboard by clicking on the target highlighted next to each screen or inside the screen loading details page.
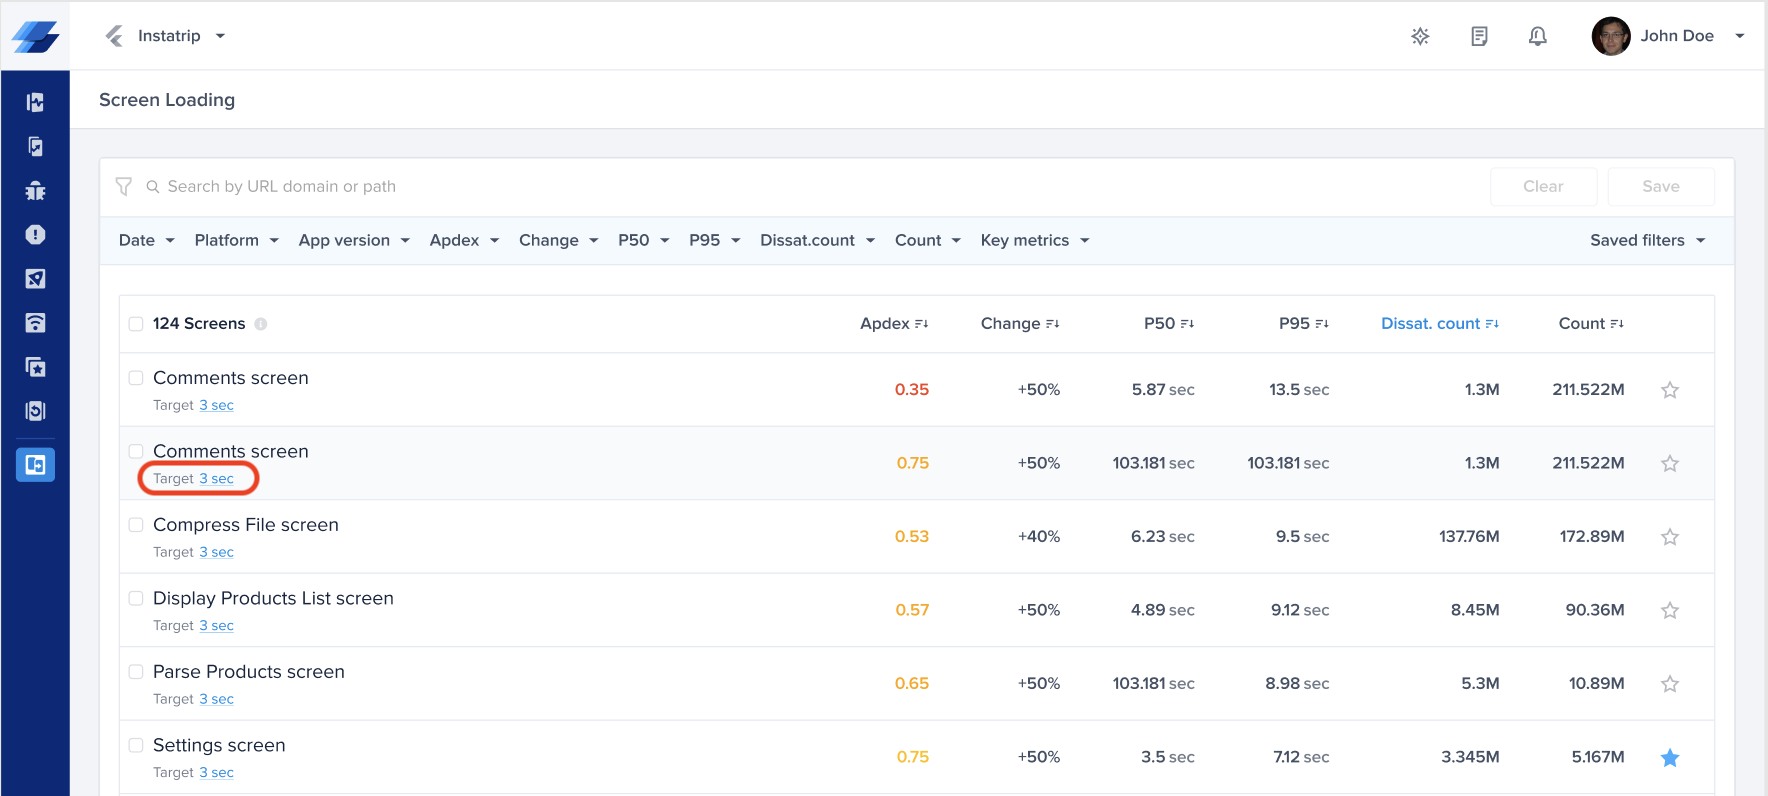
Click on the target CTA in the list to change the target for a satisfying loading duration.
You can also change it from the corresponding details page.
Disable/Enable Screen Loading
If APM is enabled, our SDK starts collecting data about your screen loading time by default. If needed, you can always toggle this on and off by updating the relevant flag after the SDK is initialized:
APM.setScreenLoadingEnabled(boolean);
Updated about 1 year ago