Integrating Instabug for iOS
This page covers how to install the Instabug SDK in your iOS application. Whether you're using Objective-C or Swift, you can follow the steps below.
Installation
This installation process will install the Instabug SDK that supports Bug Reporting, Crash Reporting and App Performance Monitoring.
There are four possible ways to integrate Instabug, either using CocoaPods, Carthage, SPM, or manually.
CocoaPods
To integrate Instabug into your Xcode project using CocoaPods, add it to your Podfile.
pod 'Instabug'
Then, run the following command.
pod install
CocoaPods will download and install the SDK and add all the required dependencies to your Xcode project. You can follow the steps here to add a script that will automatically upload your dSYMs so that your crash reports are automatically symbolicated.
Pod Update
Since CocoaPods might not always download the latest version of the SDK when using
pod install, we recommend that you also runpod update Instabugafter the installation has completed or whenever you would like to update Instabug.
Swift Package Manager
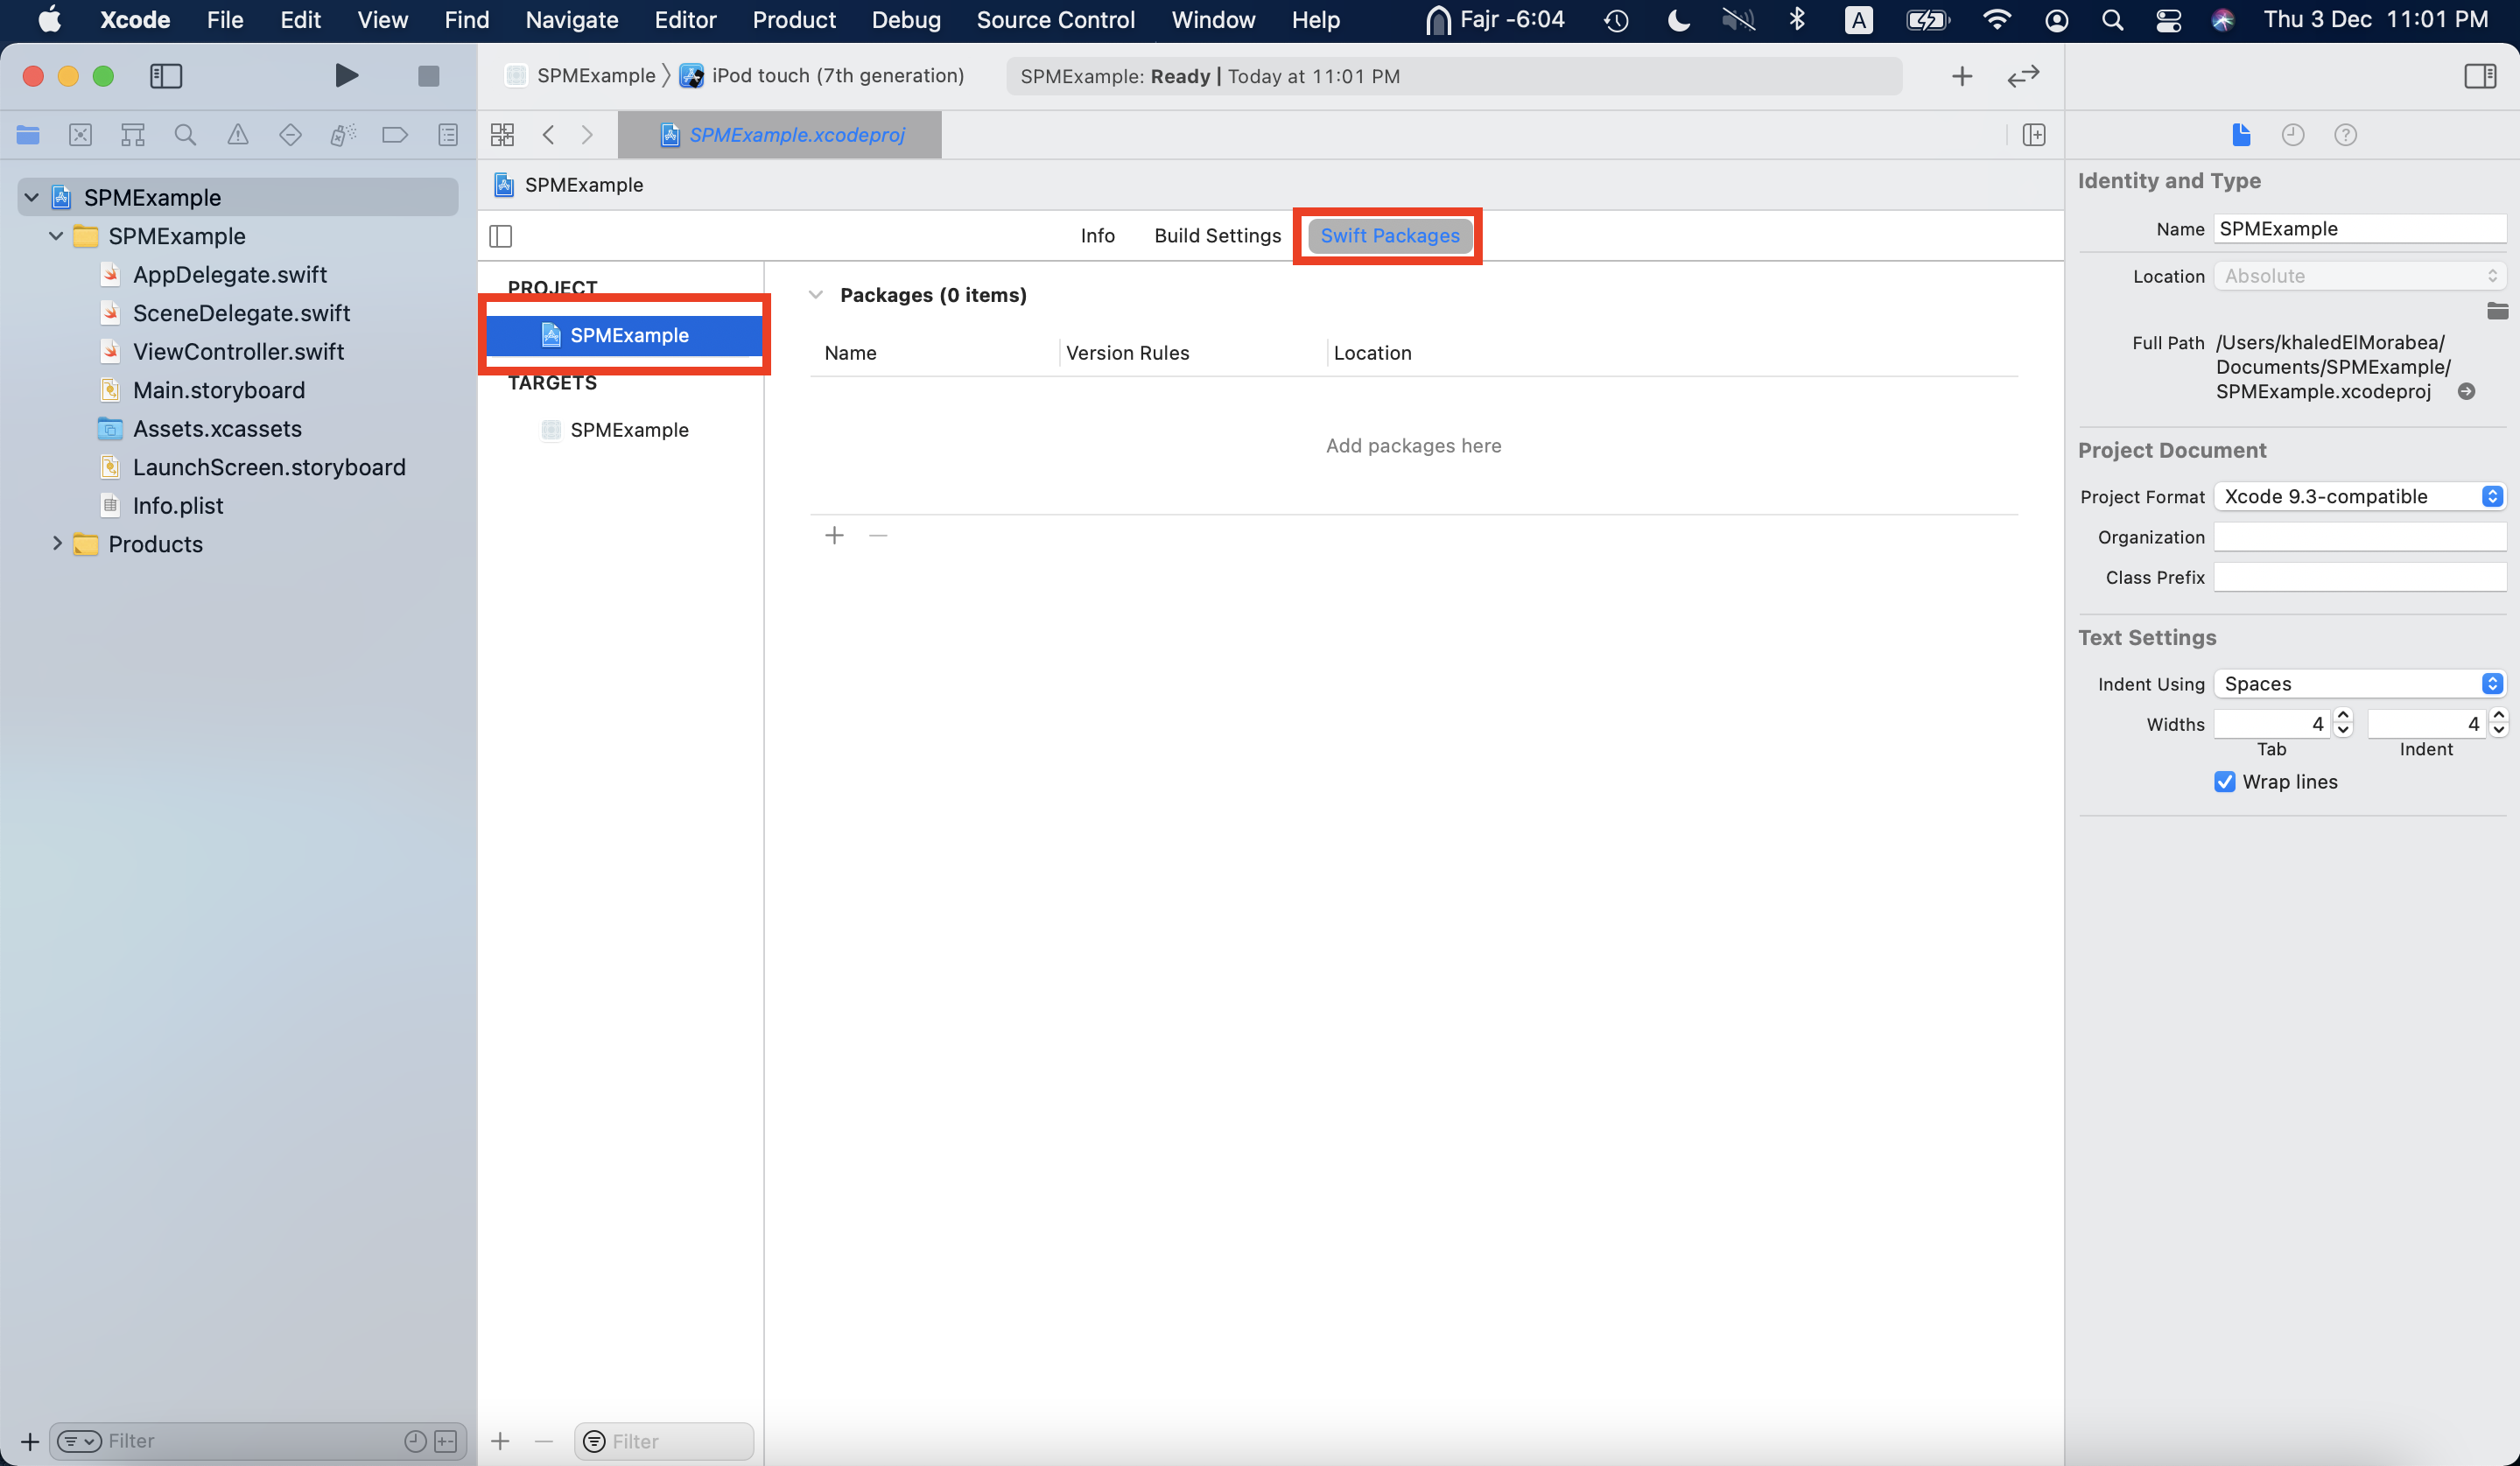
To integrate Instabug into your Xcode project using SPM, follow the below steps:
1 - Open target project
2 - Select Swift Packages as shown below

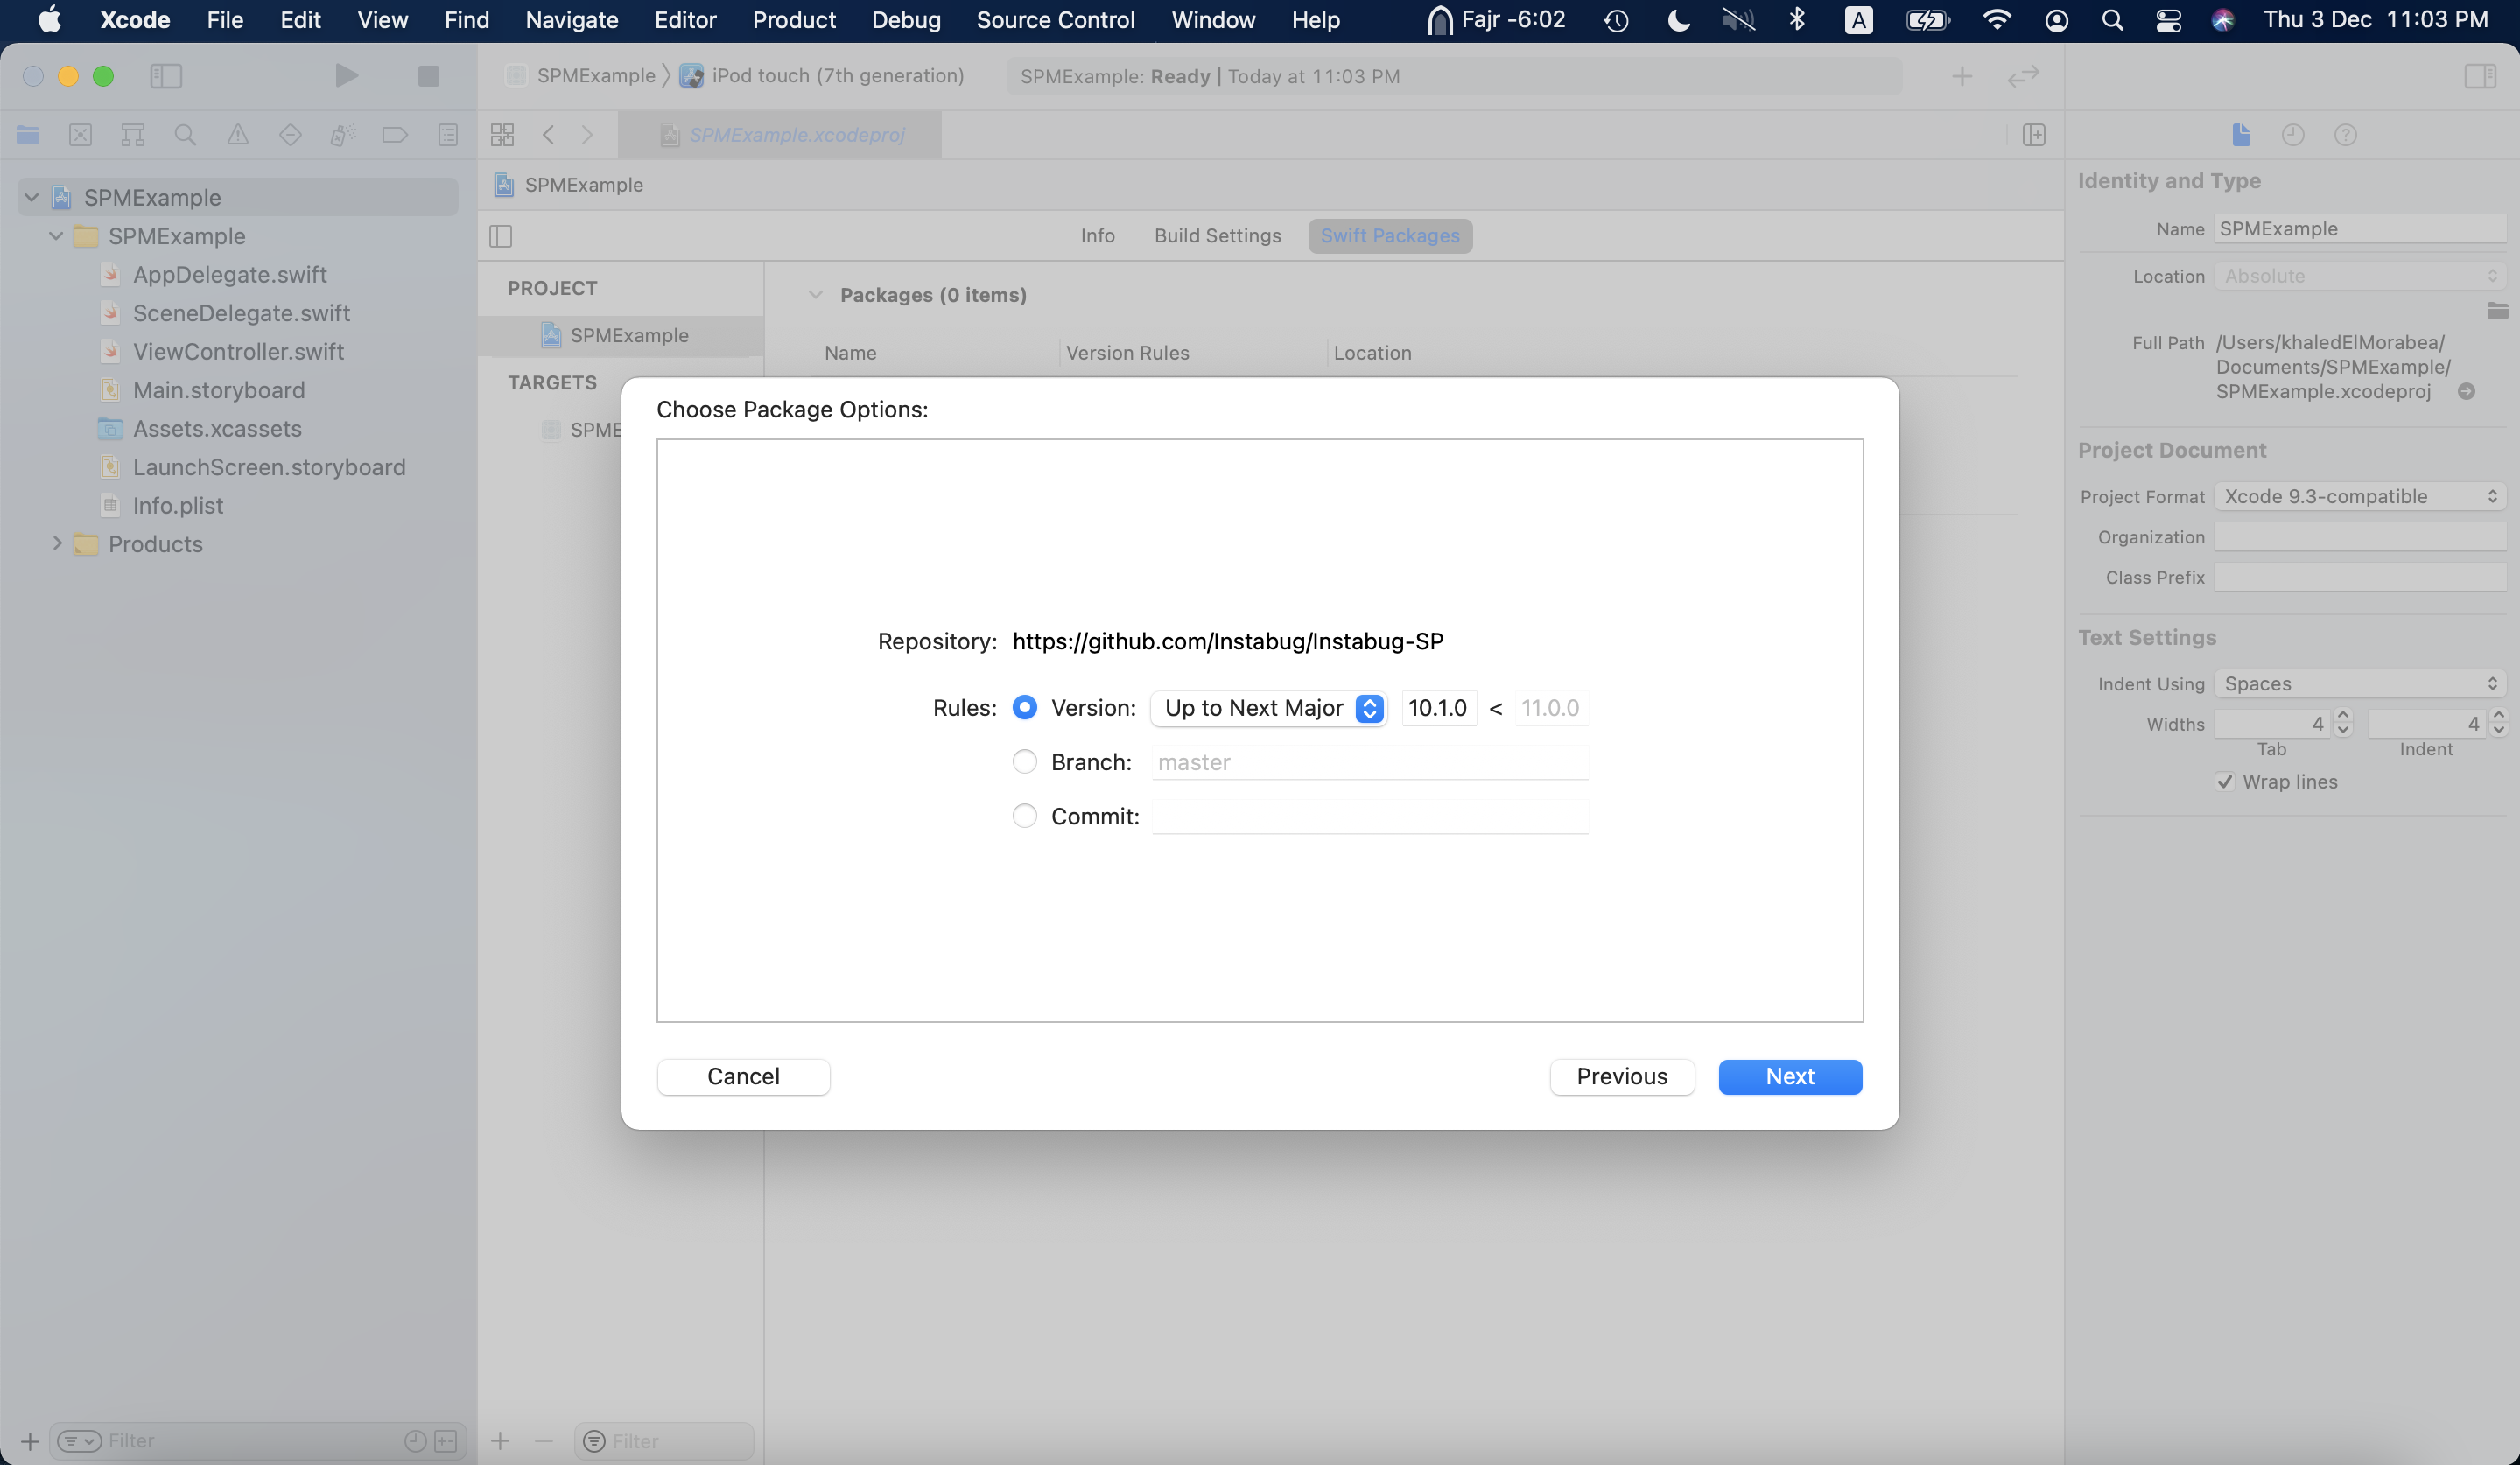
3 - Add a new package with the following link: https://github.com/Instabug/Instabug-SP

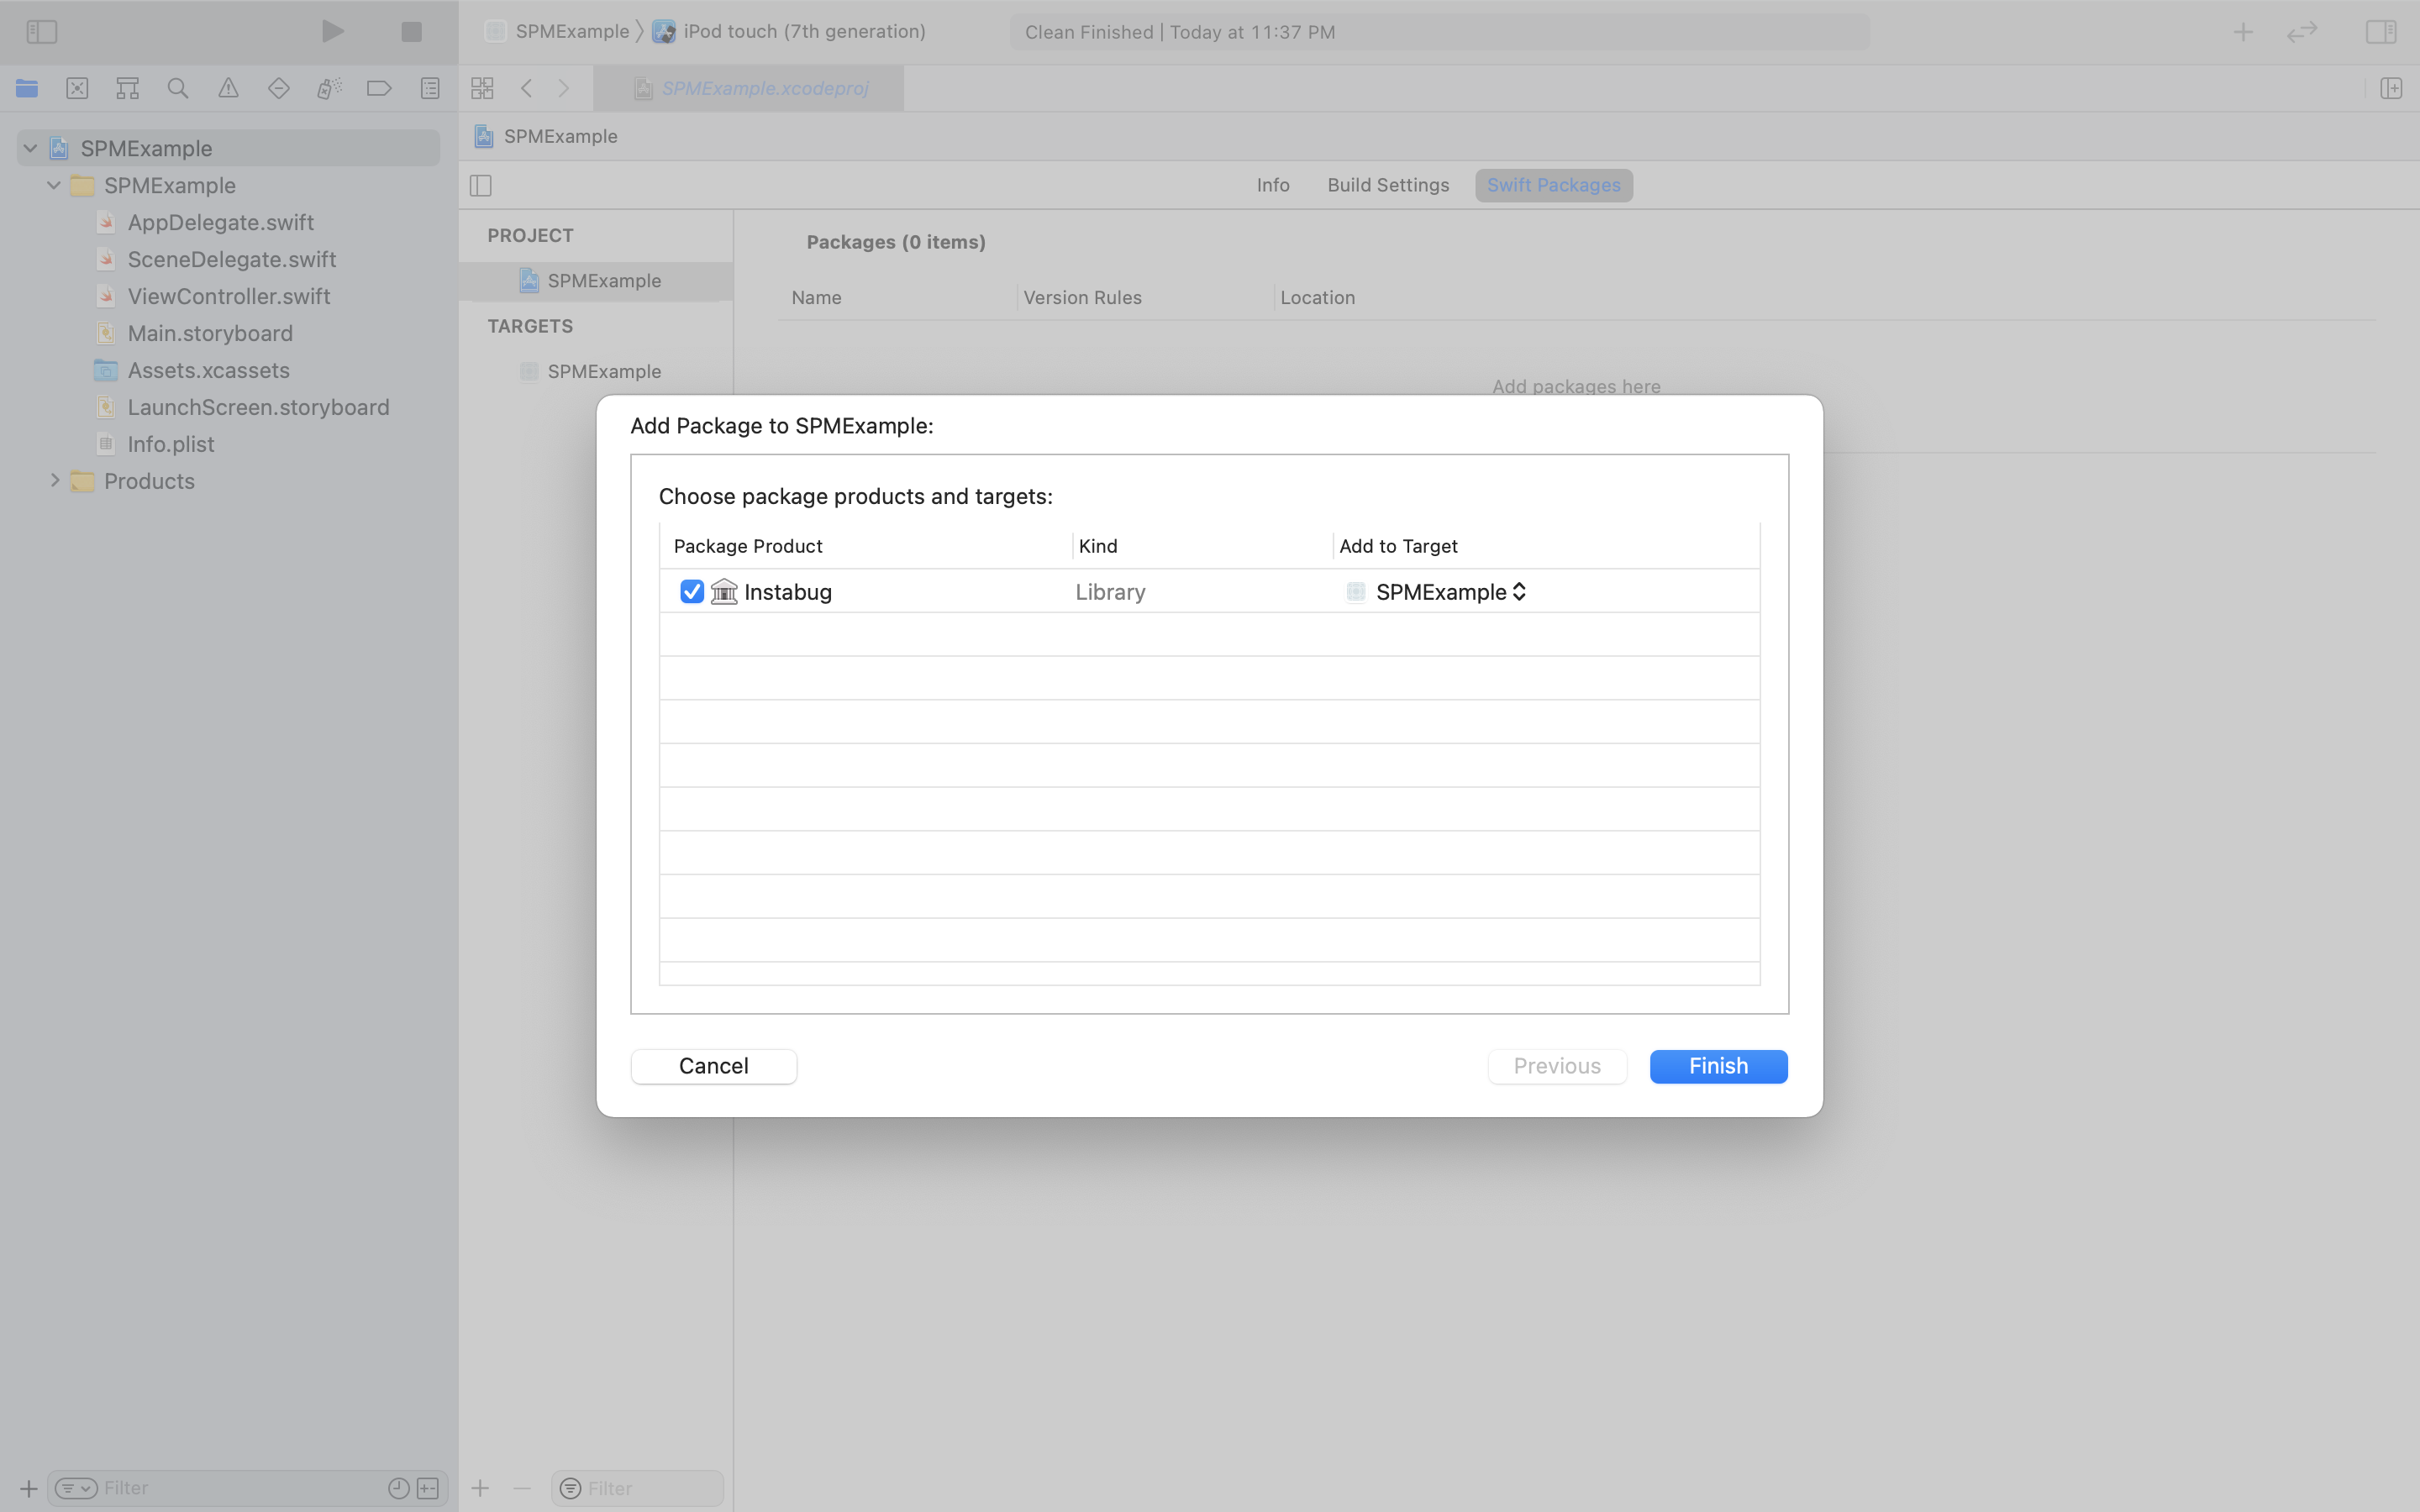
4 - Select Next then Finish

Carthage
To integrate Instabug in your Xcode project using Carthage, add it to your Cartfile.
binary "https://raw.githubusercontent.com/Instabug/Instabug-iOS/master/Instabug.json"
Then, run the following command.
carthage update
Finally, drag InstabugSDK.xcframework into your Xcode project. You can follow the steps here to add a script that will automatically upload your dSYMs so that your crash reports are automatically symbolicated.
Manually
- Download the Instabug SDK.
- Extract it, then drag and drop
InstabugSDK.xcframeworkto your project'sFrameworks, Libraries, and Embedded Contentsection under the General tab, and make sure that the Embed & Sign option is selected. - You can follow the steps here to add a script that will automatically upload your dSYMs so that your crash reports are automatically symbolicated.
Using Instabug
It is absolutely safe to include Instabug in your App Store builds as it doesn't use any private APIs. If you'd like to only include it in beta builds, that can be done two ways depending on how you create your builds, either by having separate builds or the same build for Beta and Production.
Separate Beta and Production Builds
Use this method if you create your development builds for beta testers using a different build configuration than the production builds that you submit to the App Store. You can only initialize Instabug using the profile that you use for your beta builds. To show Instabug, you can set up multiple invocation events.
The code below only enables Instabug for the DEBUG build profile.
#if DEBUG
Instabug.start(withToken: "YOUR-TOKEN-HERE", invocationEvents: [.shake, .screenshot])
#endif
#ifdef DEBUG
[Instabug startWithToken:@"YOUR-TOKEN-HERE" invocationEvents: IBGInvocationEventShake | IBGInvocationEventScreenshot]
#endif
Same Beta and Production Build
Use this method if you create your beta and production builds using the same configuration.
The following method returns YES if the app is running live from the App Store and NO if it is running from the simulator, Xcode, Fabric Beta, or TestFlight.
func isRunningLive() -> Bool {
     #if targetEnvironment(simulator)
    return false
    #else
    let isRunningTestFlightBeta  = (Bundle.main.appStoreReceiptURL?.lastPathComponent == "sandboxReceipt")
    let hasEmbeddedMobileProvision = Bundle.main.path(forResource: "embedded", ofType: "mobileprovision") != nil
    if (isRunningTestFlightBeta || hasEmbeddedMobileProvision) {
        return false
    } else {
        return true
    }
    #endif
}

if (self.isRunningLive()) {
Instabug.start(withToken: "YOUR-LIVE-TOKEN-HERE", invocationEvents: [.shake, .screenshot])
} else {
Instabug.start(withToken: "YOUR-BETA-TOKEN-HERE", invocationEvents: [.shake, .screenshot])

}
- (BOOL) isRunningLive {
    #if TARGET_OS_SIMULATOR
         return NO;
    #else
        BOOL isRunningTestFlightBeta = [[[[NSBundle mainBundle] appStoreReceiptURL] lastPathComponent] isEqualToString:@"sandboxReceipt"];
        BOOL hasEmbeddedMobileProvision = [[NSBundle mainBundle] pathForResource:@"embedded" ofType:@"mobileprovision"];
        if (isRunningTestFlightBeta || hasEmbeddedMobileProvision)
            return NO;
       return YES;
   #endif
}

if ([self isRunningLive])
   [Instabug startWithToken:@"YOUR-LIVE-TOKEN-HERE" invocationEvents: IBGInvocationEventShake | IBGInvocationEventScreenshot]

else
    [Instabug startWithToken:@"YOUR-BETA-TOKEN-HERE" invocationEvents: IBGInvocationEventShake | IBGInvocationEventScreenshot]
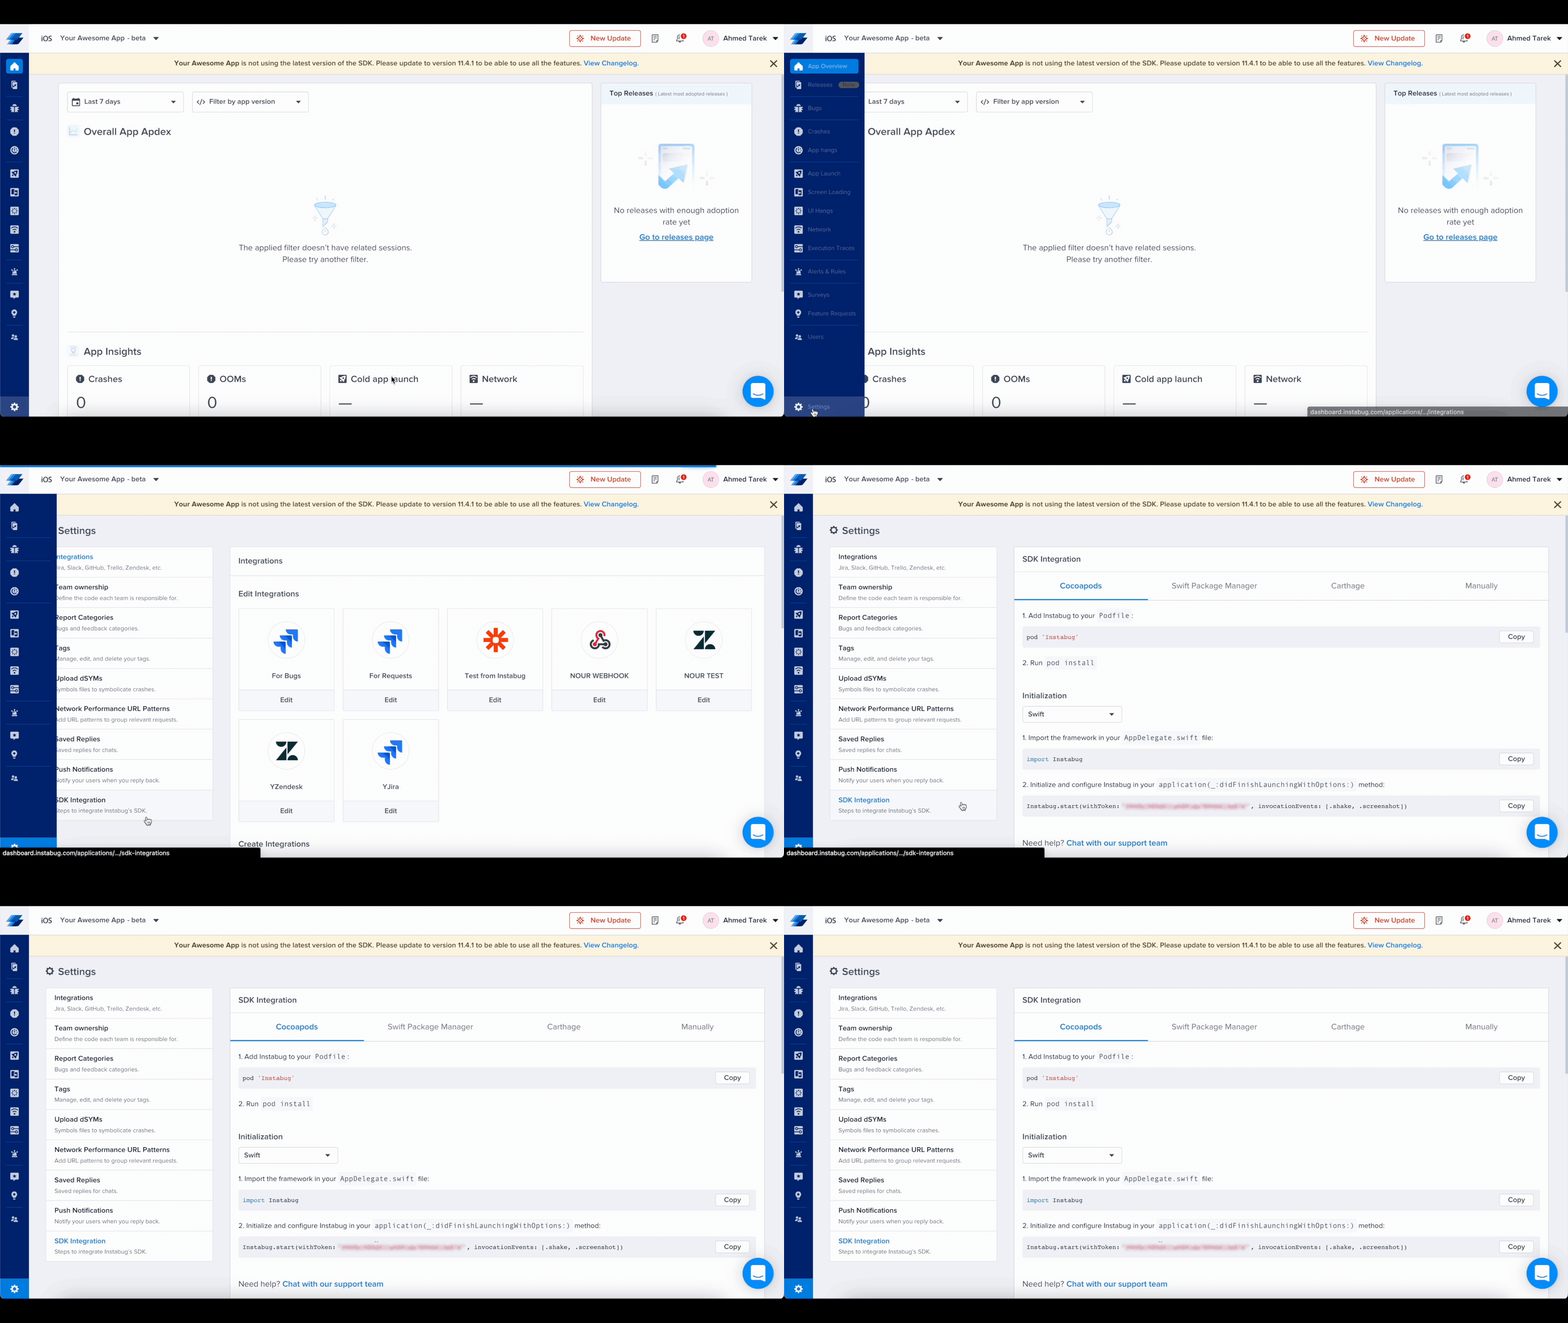
You can find your app token by selecting SDK Integration in the Settings menu from your Instabug dashboard.

Managing Permissions
Instabug needs access to the device microphone and photo library to be able to let users add audio, image, and video attachments. Starting from iOS 10, apps that don’t provide a usage description for those two permissions will be rejected when submitted to the App Store.
To prevent your app from being rejected, you’ll need to add the following two keys to your app’s info.plist file with text that explains to your app users why those permissions are needed:
NSMicrophoneUsageDescriptionNSPhotoLibraryUsageDescription
If your app doesn’t already access the microphone or photo library, we recommend usage descriptions like:
- " needs access to your microphone so you can attach voice notes."
- " needs access to your photo library so you can attach images."
The permission alert for accessing the microphone/photo library will NOT appear unless users attempt to attach a voice note/photo while using Instabug.
Permissions Are Required
The above permissions are required in order for you to receive attachments from your users through the Instabug SDK.
Updated 4 months ago
Now that you've successfully integrated Instabug, check out how to invoke Instabug using different methods, how to identify your users, or how to customize your SDK.
